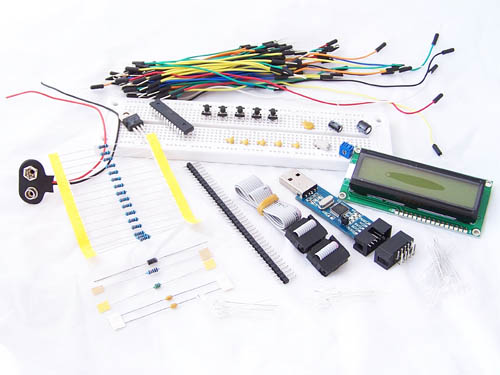
Recently a friend asked me, “What do I buy if I’m just starting out with embedded systems and want to learn?”. I told him a breadboard solution would be best and started rattling off all the bits that he would need. Then I got thinking, what if we made this a kit? So here it is…
The ATMEGA168 Experimenter’s Kit contains all the bits you need to create atmega168 circuits on a breadboard. It includes the microcontroller, breadboard, LCD module, USB Programmer and a whole lot more. The full list of included items is below. At $65.00 it is also quite a bit cheaper than buying all the bits individually.
| Part Number | Description | Quantity |
| AC-BB-700 | 700 tiepoint solderless breadboard | 1 |
| AC-PG-USBASP | USBASP AVR Programmer | 1 |
| CA-BB-75 | Breadboard jumper wire pack | 1 |
| CN-BT-9V | 9V battery clip | 1 |
| CN-HE-SM40 | 40 pin 2.54mm snappable single row header | 1 |
| CN-ID-MR10 | IDC Male connector (shrouded header), 10 pin with right angle leads | 1 |
| IC-ATMEGA168A-PU | ATMEGA168A-PU Atmel 8 Bit 16K AVR Microcontroller | 1 |
| LC-1602-YG | 16 x 2 character LCD module with yellow/green backlight | 1 |
| LE-3M-GR-WC | LED waterclear Green 3mm | 4 |
| LE-3M-OR-WC | LED waterclear Orange 3mm | 4 |
| LE-3M-RE-WC | LED waterclear Red 3mm | 8 |
| PA-CA-CA22P | 22pF 100V Resin Dipped Ceramic Axial Capacitor | 2 |
| PA-CA-CR100N | Capacitor – Resin Dipped Ceramic 50V 100nF | 5 |
| PA-CA-EL100U | Capacitor – Electrolytic 25V 100 uF | 1 |
| PA-CA-EL47U | Capacitor – Electrolytic 25V 47 uF | 1 |
| PA-CY-20M | 20MHz Crystal in HC/49S through hole package | 1 |
| PA-IN-AX10U | Inductor (Choke) – 10μH, Axial leaded | 1 |
| PA-PTC-500 | PPTC Resettable Fuse – 72V, 500mA (RXEF050) | 1 |
| PA-RP-TR1K | Single Turn Cermet Trimpot 1K | 1 |
| PA-RY-MFQ10K | Resistor – Metal Film 1/4W – 10K | 1 |
| PA-RY-MFQ330 | Resistor – Metal Film 1/4W – 330 ohm | 16 |
| SC-DI-1N4004 | 1N4004 General purpose 1A Rectifier Diode | 1 |
| SC-VR-L7805 | L7805 +5V Linear Voltage Regulator | 1 |
| SW-TM-SPST | Micro Tactile momentary SPST switch | 5 |


Works like a train!
I’ve built the part with the LED blinking 3 times, the ‘Hello World’ LCD test program and the AD converter, all on one breadboard.
I added a foto transistor in the AD convertor schematic and now it gives me a measure of light!
The parts I received differ slightly from the list above, some of them as of yet no idea what to use them for.
Nice, neat and quick delivery, handy tutorials, I recommend this ATmega168 set to everybody, the price is very competative also.
Question: could you perhaps create an article building a cloak or alarmclock with this kit? Shouldn’t be too difficult to use the internal timer, some of the pushbuttons and the lcd together to form some sort of digital clock?